
✓For official Ballr Live only; custom RTMP does not use these overlays.
✓A club or team administrator with access to the team prepares the artwork. The App operator needs control permission for the live session.
✓Check that the camera and overlay package belong to the same team and maintain the required phone and camera connections.
Scope and workflow
Prepare and enable a team overlay package in Ballr Hub, then control its visibility from Manage live in the Ballr App. The upper-right image and lower banner have separate switches.
Prepare your images
- Upper-right image: 1:1 aspect ratio; 800×800 pixels recommended.
- Lower banner: 8:1 aspect ratio; 1600×200 pixels recommended.
- PNG, JPG or WebP; no more than 2 MB per image. Use transparent PNG for transparency. Export the correct aspect ratio; renaming a file extension does not convert an image.
- Upload either image or both. Use artwork you are entitled to display and keep text readable without covering the match.
Upload and enable in Ballr Hub
- 1
Sign in to Ballr Hub, open Live in the team workspace and find Live overlays.
- 2
If a team selector appears, select the camera’s team. Otherwise check the displayed team name.
- 3
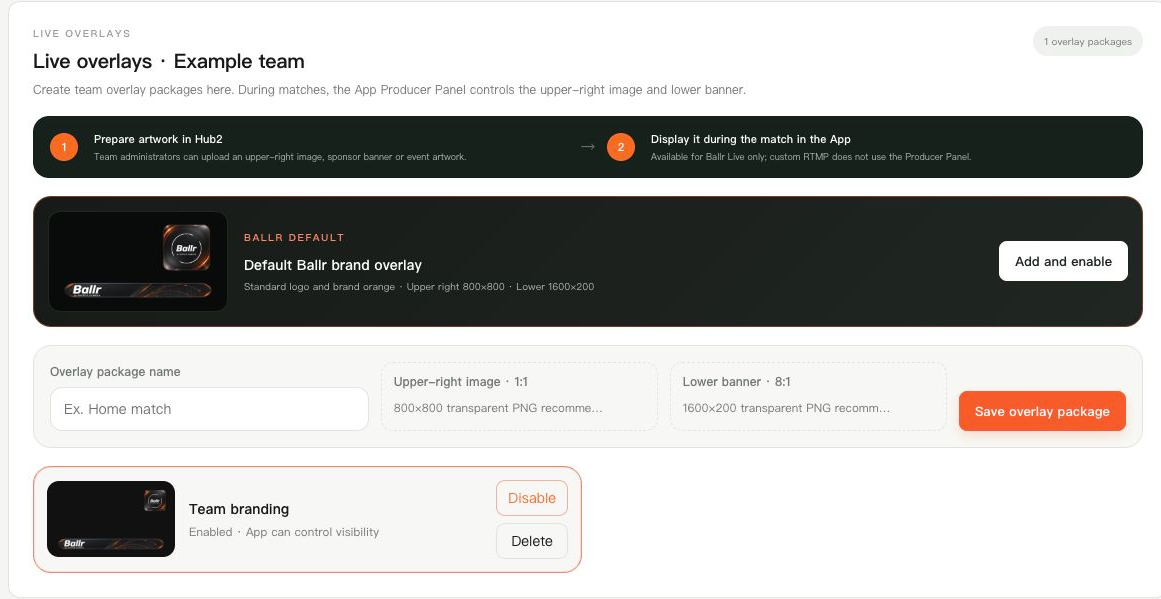
Enter an Overlay package name and select an Upper-right image and/or Lower banner.
- 4
Choose Save overlay package and wait for its image previews. A newly saved package still needs Enable.
- 5
Check Enabled · App can control visibility. Only one package can be active per team; enabling another disables the previous package.
 View full size ↗
The actual Ballr Hub 2.3.205 overlay component with an example team and no customer data. Note the image requirements, Save control and enabled status.
Use the default Ballr artwork
- 1
If you do not have sponsor artwork yet, choose Add and enable in Default Ballr brand overlay.
- 2
If already installed but inactive, choose Enable default overlay. Once enabled, turn on the desired positions in the App.
Control visibility in the Ballr App
- 1
After starting official Ballr Live, open Manage live on the camera control screen.
- 2
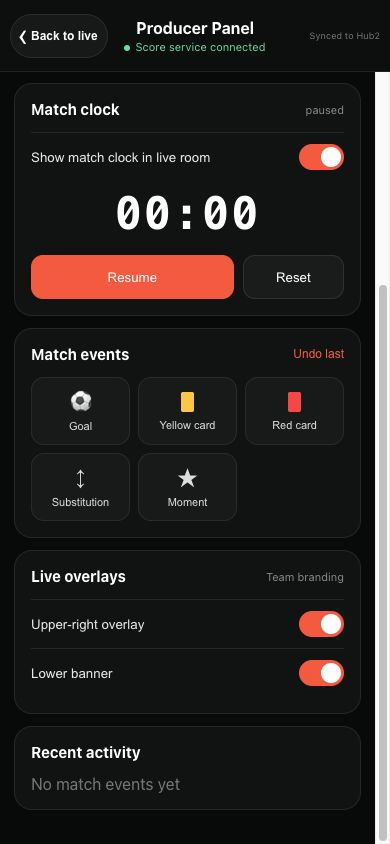
Scroll to Live overlays and check the package name.
- 3
Turn on Upper-right overlay and Lower banner as needed. Each switch is independent; a slot without an uploaded image is unavailable.
- 4
Wait for synchronization and check the preview. You can hide either position during the match without stopping the stream.
 View full size ↗
The actual Ballr App 2.2.183 Manage live component, scrolled to Live overlays, with demo data. The two orange switches control the upper-right and lower positions.
Check the viewer experience
- 1
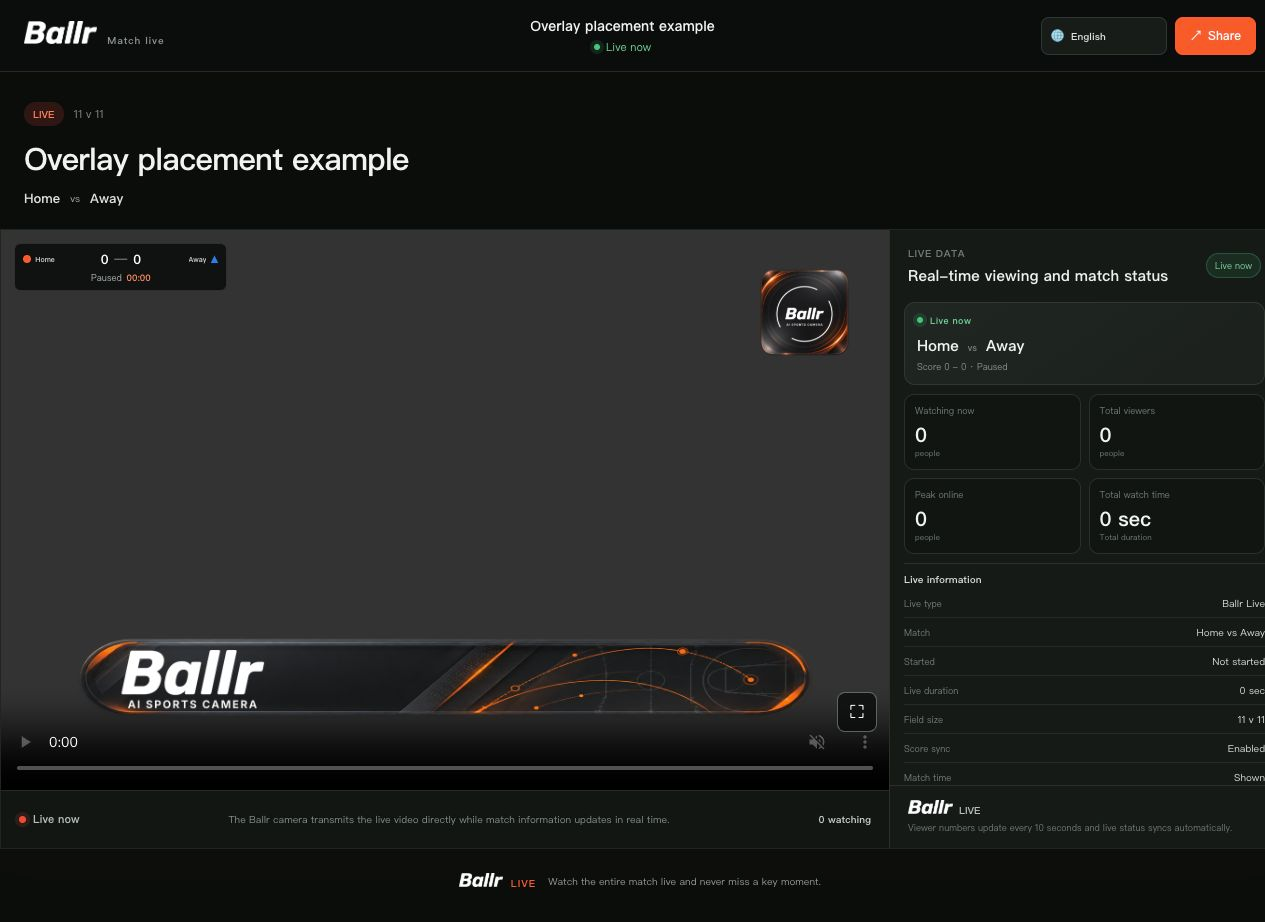
Open this session’s official viewer link on another connected device. Check both positions and ensure the artwork does not obscure the score or important play.
- 2
Check normal and fullscreen viewing. These are overlays in the official viewer and App preview; this does not mean they are burned into original recordings or automatically added to third-party RTMP video.
 View full size ↗
Overlay placement in the actual Hub2 2.3.205 official viewer component, using default artwork and demo scores. No real stream is connected; the black area is the video stage, not proof of successful live playback.
Replace, disable or delete artwork
- To replace artwork, create and enable another package in Hub. Refresh the App and check its name; if the old name remains, close and reopen Manage live, toggle visibility again and verify the viewer.
- For temporary hiding, use the App switches. After disabling or changing a package in Hub, also verify the ongoing viewer; the package list alone is not proof of the displayed result.
- Deleting a package clears the live overlay switches that reference it and has no recycle-bin restore. Confirm the team and package name first; reuse requires uploading again.
Troubleshoot missing overlays
- No active overlay package in Hub2: check the team, Save and Enable.
- Disabled switch: check that the package contains an image for that slot, no update is pending, and you have session-control permission.
- Upload fails: check image type, the 2 MB limit and the 1:1 or 8:1 ratio, then export and upload again.
- Enabled but invisible: check the official viewer link and session, refresh the App state, toggle visibility and refresh the viewer. Custom RTMP requires the third-party platform’s own advertising tools.
- Still not working: contact Ballr Support with the team, live time, App version, package status and viewer screenshots. Hide contact details, stream keys and other sensitive information.
If your screen differs from this guide, check the camera model, App or firmware version, account role and organization service status.