
Position first, then mark the pitch
- 1
Place the camera near the halfway line, about 3–5 m outside the touchline as a starting distance. Raise the tripod to the specified height, lock it and keep the camera level.
- 2
Check that both halves and the pitch corners are visible. Do not move the camera after confirming the boundary; if the position changes, set the boundary again.
Choose the size, then mark the boundary
- 1
During an ordinary recording, open Match details and choose Small (3v3 / 5v5), Medium (7v7) or Large (11v11) for the field size. Save the match details. Size selection does not replace boundary marking.
Open Set field and enter the editor
- 1
During a normal recording, open Set field from the recording controls. Recording continues during setup. Wait for the current camera panorama.
- 2
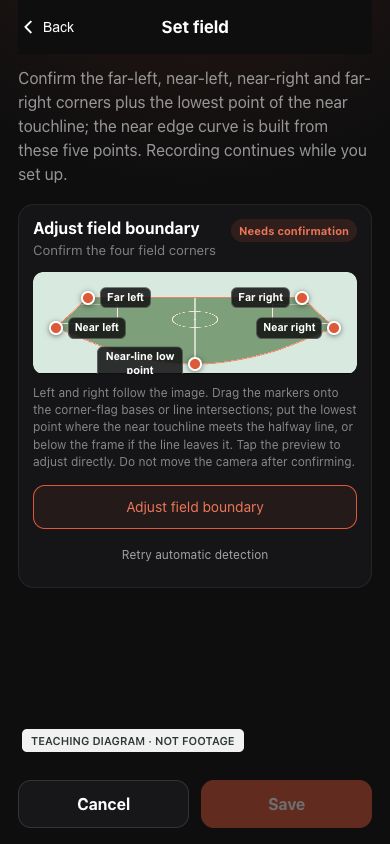
Tap the preview or Adjust field boundary. Automatic detection is only a suggestion that you must check. Left and right follow the image; near and far refer to the camera side.
 View full size ↗
Entry screen: open the preview or Adjust field boundary. Save stays disabled until the points are confirmed. The unmodified current App editor uses an illustrated teaching background, not match footage or an accepted field calibration. Mark your own camera image. Open the image to enlarge it.
Left side: far-left and near-left corners
- 1
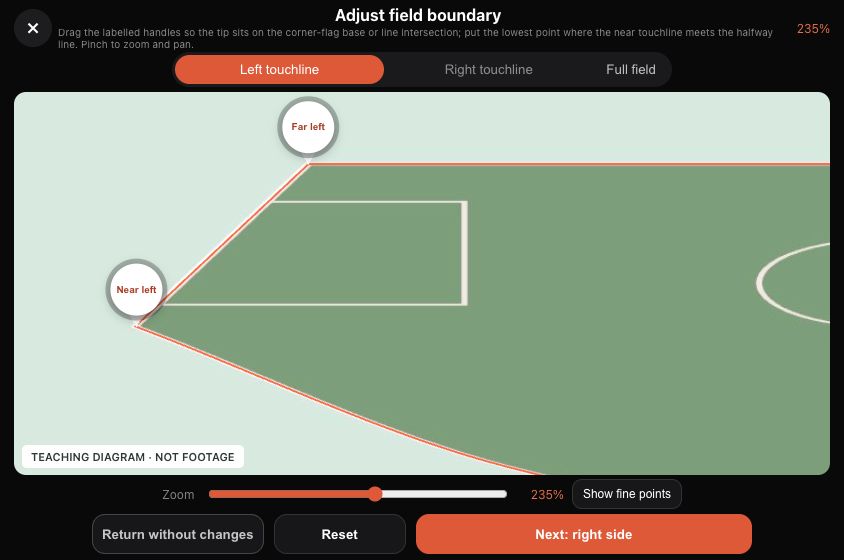
In Left touchline, locate the two actual left corners: Far left is away from the camera; Near left is closer.
- 2
Drag each labelled round handle so its pointed tip—not the circle centre—lands on the corner-flag base or boundary-line intersection. Do not aim at the top of the flag.
- 3
Pinch to zoom and pan, or use the Zoom slider. The magnifier helps while dragging. Check both points, then select Next: right side.
 View full size ↗
Enlarged left view: the tips mark the far-left and near-left corners. The unmodified current App editor uses an illustrated teaching background, not match footage or an accepted field calibration. Mark your own camera image. Open the image to enlarge it.
Right side: near-right and far-right corners
- 1
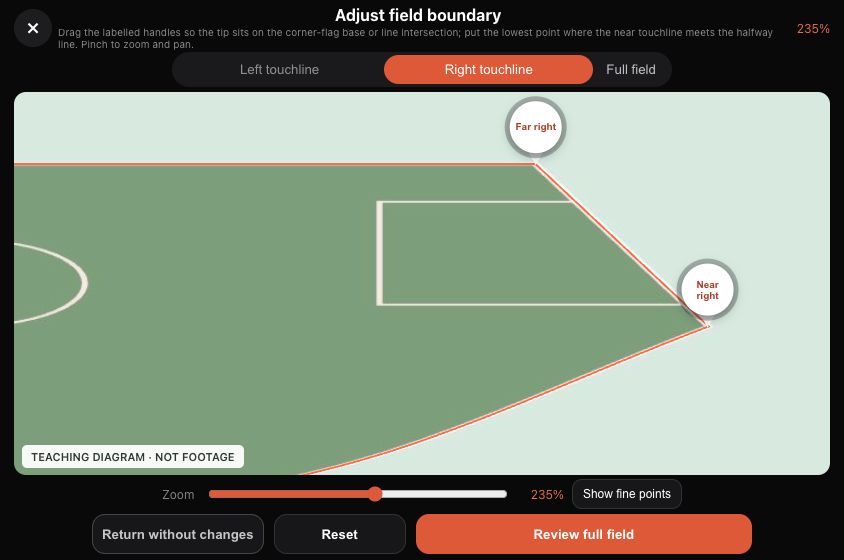
In Right touchline, adjust Near right and Far right the same way. Do not swap sides with the direction of play or select a penalty-area, track or neighbouring-pitch intersection.
- 2
After checking all four corners, select Review full field. This opens the overview; it does not save the setup.
 View full size ↗
Check the two right corners before returning to the full view. The unmodified current App editor uses an illustrated teaching background, not match footage or an accepted field calibration. Mark your own camera image. Open the image to enlarge it.
Full view: place the near-line low point
- 1
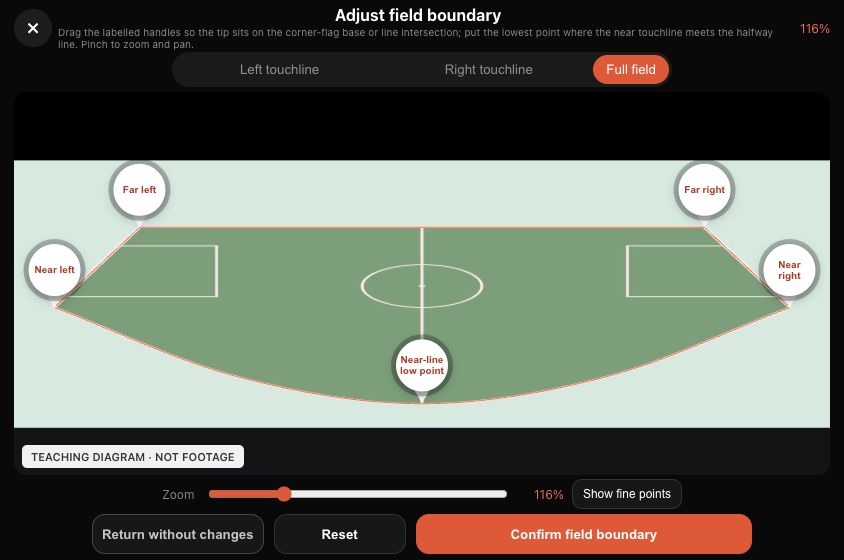
Adjust Near-line low point in Full field. The side views focus on corners; return to the full view for this point.
- 2
With the camera positioned near halfway, put the tip where the near touchline meets the halfway line—not at the centre circle, pitch centre or bottom edge of the picture.
- 3
Place the four corners and this fifth point first, then inspect the near curve. Do not force a curved panoramic boundary into a straight rectangle.
 View full size ↗
The five basic points: four corners and one near-line low point. The unmodified current App editor uses an illustrated teaching background, not match footage or an accepted field calibration. Mark your own camera image. Open the image to enlarge it.
Show fine points and refine the near curve
- 1
If either half of the near curve still misses the actual touchline after the five basic points are correct, select Show fine points. Two auxiliary handles labelled Fine appear.
- 2
Drag each fine point to align its part of the curve with the real touchline. These are not extra corners and do not replace the middle low point.
- 3
Set the basic points before fine-tuning. A fine point you moved manually no longer follows basic-point changes automatically, so recheck both curve halves after later adjustments. Hide fine points hides handles without undoing edits.
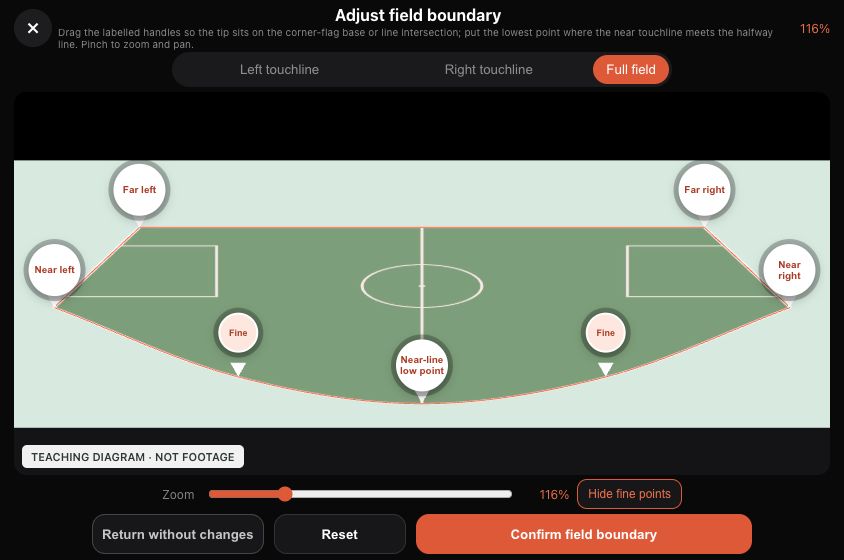 View full size ↗
Seven handles when expanded: four corners, one low point and two fine points. The unmodified current App editor uses an illustrated teaching background, not match footage or an accepted field calibration. Mark your own camera image. Open the image to enlarge it.
When the near touchline leaves the image
- 1
If its intersection with halfway is outside the image, place the low point in the Outside the frame area below the picture. Zoom out or pan as needed; do not move it into the pitch just to keep it visible.
- 2
The diagram explains the outside area, not exact coordinates for your pitch. If you cannot reliably locate a corner or the line continuation, check the viewpoint and panorama instead of saving guessed defaults; contact Ballr Support if needed.
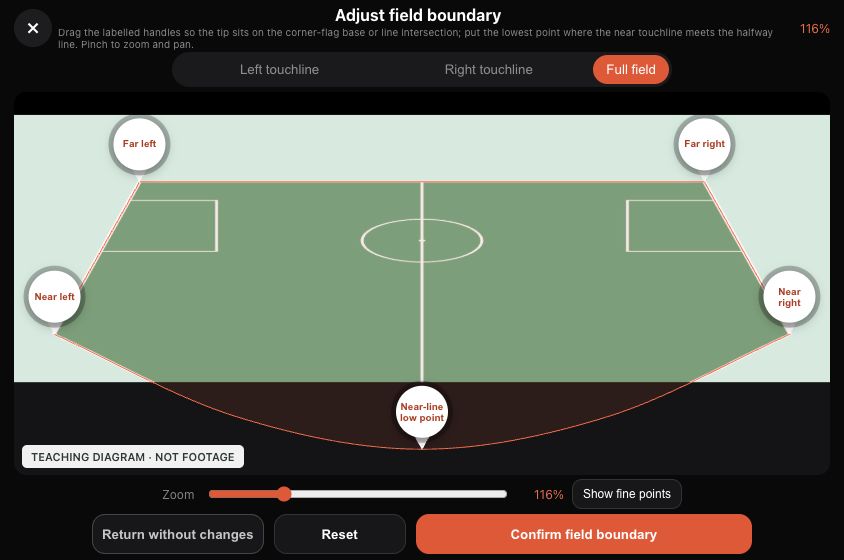 View full size ↗
Outside-frame example: a point can sit below the picture, but its position still needs checking. The unmodified current App editor uses an illustrated teaching background, not match footage or an accepted field calibration. Mark your own camera image. Open the image to enlarge it.
Confirm the boundary, then Save
- 1
In Full field, review four corners, the low point and both near-curve halves. Exclude the running track, substitutes and neighbouring pitches. Select Confirm field boundary.
- 2
Back on Set field, check Confirmed, then tap Save at the bottom. Confirmed does not mean saved, and it does not prove synchronization.
- 3
Reset starts point selection again; Return without changes discards the current editing draft. After saving, any camera movement, rotation, height or tilt change requires setup again on the new panorama.
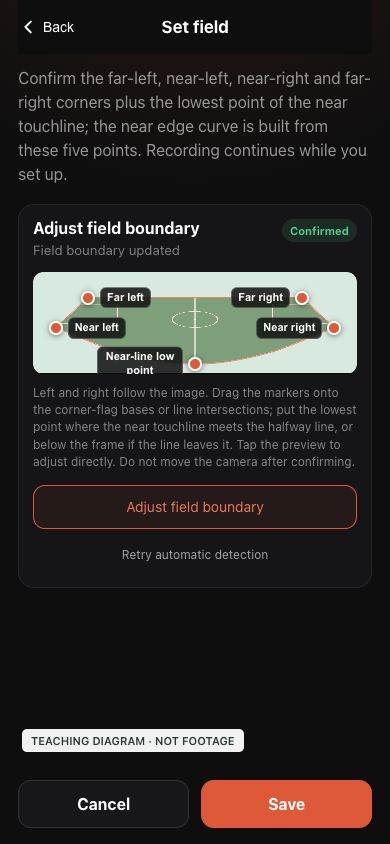 View full size ↗
You still need Save on the parent screen. This illustration stops before saving; no camera or cloud success is simulated. The unmodified current App editor uses an illustrated teaching background, not match footage or an accepted field calibration. Mark your own camera image. Open the image to enlarge it.
Check the result
- Confirm the field status is saved. A pending synchronization status is not confirmation that the cloud has received the outline; reconnect and check again.
- The App may ask for a missing field size when finishing. Complete the selection and follow the saving confirmation.
- A missing preview frame does not mean the recording file is lost. Keep the original video; do not repeatedly upload it to repair an outline. For an uploaded recording, use the Hub field-correction guide.
Recheck in this order after repositioning
- 1
Choose the final position, tripod height and direction, keep the camera level and lock the fittings. Check that both halves are visible. Do not move the camera or tripod after completing setup.
- 2
Open Set field in the Ballr App, or the field-confirmation page for your workflow. Check that the panorama shows the new viewpoint; do not redraw over an old screenshot.
- 3
Confirm the far-left, near-left, near-right and far-right corners and the lowest point of the near touchline. Match the real boundary, exclude off-pitch areas, save and check the status. Choosing a pitch size does not replace redrawing the boundary.
A knock or persistent shaking: secure the camera first
- Stop unsafe use. To inspect the mount, safely lower the tripod as instructed and support the camera before checking the tripod, quick-release fitting and locks. Do not release a raised mount or carry a fully extended tripod.
- Once stable, check the view and set the field again if position or direction changed. Redrawing cannot fix persistent shaking. Stop use and contact Ballr Support if anything remains loose or damaged. Still trees do not rule out a tripod or mount problem.
If the camera moves during recording
- Note the recording time of the movement and retain the original video and views before and after it. Overwriting one boundary does not necessarily fix both viewpoints within the same recording.
- For a planned move, use a break in play to stop and save the current recording, then safely reposition and secure the camera. Start a new recording and use Set field again in the recording menu. Recording continues during setup; check the timer and save status.
If your screen differs from this guide, check the camera model, App or firmware version, account role and organization service status.